Tampilan : Daftar Grid
Showing posts with label how to. Show all posts

How to Create Navigation Menu Using Only CSS


In this tutorial we will be creating a basic responsive navigation menu with dropdown using only HTML and CSS. Many navigation menus (especially responsive ones) are created using a combination of HTML, CSS and Javascript. This simple CSS only method will demonstrate that Javascript isn't always necessary!
The code we will create includes only the most essential CSS required for structure and basic styling. This makes it much easier to follow and understand the purpose of each line of code. It also means that the end product is primed and ready for your unique customization.
Live Demo

A Quick Message

Big thanks to the commenters that informed us of an issue this code was having on mobile devices! We have now amended the code using the checkbox method found here: http://bit.ly/1pMflzW as suggested by Sean Savoie.

The HTML

As you can see I have declared the HTML5 doctype, and included the basic page structure. The only content within the body tags is a nested unordered list. To demonstrate which top level links will have dropdowns, I have included a unicode down arrow (↓).
<!doctype html>
<html lang="en">
<head>
 <meta charset="UTF-8">
 <title>CSS Only Navigation Menu</title>
 <meta name="viewport" content="width=device-width, initial-scale=1">
 <link rel="stylesheet" href="style.css">
</head>
<body>
 <ul id="menu">
  <li><a href="#">Home</a></li>
  <li>
   <a href="#">About ↓</a>
   <ul class="hidden">
    <li><a href="#">Who We Are</a></li>
    <li><a href="#">What We Do</a></li>
   </ul>
  </li>
  <li>
   <a href="#">Portfolio ↓</a>
   <ul class="hidden">
    <li><a href="#">Photography</a></li>
    <li><a href="#">Web & User Interface Design</a></li>
    <li><a href="#">Illustration</a></li>
   </ul>
  </li>
  <li><a href="#">News</a></li>
  <li><a href="#">Contact</a></li>
 </ul>
</body>
</html>

The CSS

First of all, some basic styling to the ul and li elements to remove bullet points and other list styles. The inline-block and float:left attributes make the list display horizontally.
/*Strip the ul of padding and list styling*/
ul {
 list-style-type:none;
 margin:0;
 padding:0;
 position: absolute;
}

/*Create a horizontal list with spacing*/
li {
 display:inline-block;
 float: left;
 margin-right: 1px;
}
The following attributes are almost exclusively for aesthetic appeal. If you intend to style this menu to your liking then this is the section of code to fiddle about with.
/*Style for menu links*/
li a {
 display:block;
 min-width:140px;
 height: 50px;
 text-align: center;
 line-height: 50px;
 font-family: "Helvetica Neue", Helvetica, Arial, sans-serif;
 color: #fff;
 background: #2f3036;
 text-decoration: none;
}

/*Hover state for top level links*/
li:hover a {
 background: #19c589;
}

/*Style for dropdown links*/
li:hover ul a {
 background: #f3f3f3;
 color: #2f3036;
 height: 40px;
 line-height: 40px;
}

/*Hover state for dropdown links*/
li:hover ul a:hover {
 background: #19c589;
 color: #fff;
}
Next up, some styling for the dropdown links. The first class defines that the dropdown will not be visible by default. And the final class says that the dropdown element will become visible on top level link hover.
/*Hide dropdown links until they are needed*/
li ul {
 display: none;
}

/*Make dropdown links vertical*/
li ul li {
 display: block;
 float: none;
}

/*Prevent text wrapping*/
li ul li a {
 width: auto;
 min-width: 100px;
 padding: 0 20px;
}

/*Display the dropdown on hover*/
ul li a:hover + .hidden, .hidden:hover {
 display: block;
}
responsive menu css3 The navigation menu is ready for desktop use now, however we should also include some love for mobile users. Using a media query I target devices with a max width of 760px and make a few changes to the code.
/*Responsive Styles*/

@media screen and (max-width : 760px){
 /*Make dropdown links appear inline*/
 ul {
  position: static;
  display: none;
 }
 /*Create vertical spacing*/
 li {
  margin-bottom: 1px;
 }
 /*Make all menu links full width*/
 ul li, li a {
  width: 100%;
 }
}

Optional Final Step

Space is limited on mobile devices, so it would be cool if we also had a button prompting mobile users to click a button before displaying the whole menu. To do this a couple of lines of code to the HTML where you want the button to appear.
<label for="show-menu" class="show-menu">Show Menu</label>
<input type="checkbox" id="show-menu" role="button">
Add the following code into the CSS anywhere outside the media query:
/*Style 'show menu' label button and hide it by default*/
.show-menu {
 font-family: "Helvetica Neue", Helvetica, Arial, sans-serif;
 text-decoration: none;
 color: #fff;
 background: #19c589;
 text-align: center;
 padding: 10px 0;
 display: none;
}

/*Hide checkbox*/
input[type=checkbox]{
    display: none;
}

/*Show menu when invisible checkbox is checked*/
input[type=checkbox]:checked ~ #menu{
    display: block;
}
And this code within the media query:
 /*Display 'show menu' link*/
 .show-menu {
  display:block;
 }
responsive menu css3

Complete Code

HTML:
<!doctype html>
<html lang="en">
<head>
 <meta charset="UTF-8">
 <title>CSS Only Navigation Menu</title>
 <meta name="viewport" content="width=device-width, initial-scale=1">
 <link rel="stylesheet" href="style.css">
</head>
<body>
 <label for="show-menu" class="show-menu">Show Menu</label>
 <input type="checkbox" id="show-menu" role="button">
  <ul id="menu">
  <li><a href="#">Home</a></li>
  <li>
   <a href="#">About ↓</a>
   <ul class="hidden">
    <li><a href="#">Who We Are</a></li>
    <li><a href="#">What We Do</a></li>
   </ul>
  </li>
  <li>
   <a href="#">Portfolio ↓</a>
   <ul class="hidden">
    <li><a href="#">Photography</a></li>
    <li><a href="#">Web & User Interface Design</a></li>
    <li><a href="#">Illustration</a></li>
   </ul>
  </li>
  <li><a href="#">News</a></li>
  <li><a href="#">Contact</a></li>
 </ul>
</body>
</html>
CSS:
/*Strip the ul of padding and list styling*/
ul {
 list-style-type:none;
 margin:0;
 padding:0;
 position: absolute;
}

/*Create a horizontal list with spacing*/
li {
 display:inline-block;
 float: left;
 margin-right: 1px;
}

/*Style for menu links*/
li a {
 display:block;
 min-width:140px;
 height: 50px;
 text-align: center;
 line-height: 50px;
 font-family: "Helvetica Neue", Helvetica, Arial, sans-serif;
 color: #fff;
 background: #2f3036;
 text-decoration: none;
}

/*Hover state for top level links*/
li:hover a {
 background: #19c589;
}

/*Style for dropdown links*/
li:hover ul a {
 background: #f3f3f3;
 color: #2f3036;
 height: 40px;
 line-height: 40px;
}

/*Hover state for dropdown links*/
li:hover ul a:hover {
 background: #19c589;
 color: #fff;
}

/*Hide dropdown links until they are needed*/
li ul {
 display: none;
}

/*Make dropdown links vertical*/
li ul li {
 display: block;
 float: none;
}

/*Prevent text wrapping*/
li ul li a {
 width: auto;
 min-width: 100px;
 padding: 0 20px;
}

/*Display the dropdown on hover*/
ul li a:hover + .hidden, .hidden:hover {
 display: block;
}

/*Style 'show menu' label button and hide it by default*/
.show-menu {
 font-family: "Helvetica Neue", Helvetica, Arial, sans-serif;
 text-decoration: none;
 color: #fff;
 background: #19c589;
 text-align: center;
 padding: 10px 0;
 display: none;
}

/*Hide checkbox*/
input[type=checkbox]{
    display: none;
}

/*Show menu when invisible checkbox is checked*/
input[type=checkbox]:checked ~ #menu{
    display: block;
}


/*Responsive Styles*/

@media screen and (max-width : 760px){
 /*Make dropdown links appear inline*/
 ul {
  position: static;
  display: none;
 }
 /*Create vertical spacing*/
 li {
  margin-bottom: 1px;
 }
 /*Make all menu links full width*/
 ul li, li a {
  width: 100%;
 }
 /*Display 'show menu' link*/
 .show-menu {
  display:block;
 }
}

Conclusion & Live Demo

Live Demo This code should work just fine in modern browsers, and doesn't rely on any javascript which can slow down page load times. Be sure to check out the live demo and use the code however you like!
#A3

How To Create Table Of Contents in Blogger


Create Table Of Contents in Blogger : 
 By Creating Table of Contents in your Blog will help you to arrange your Blog Contents category wise.This Widget is specially designed for blogs which contains alot of categories , this widget will enable them to place all the categories along-with the specific posts in a page called "Table of Contents".The most interesting fact about this widget is that it will help the readers to inform that which post is "New" and which is "Old" . The word New will dance with latest posts and Old will be with Old Posts.
 

How To Create Table Of Contents in Blogger

  • Get into Blogger Dashboard
  • Click On Pages
  • Create a Static Page
  • Click On HTML of the Page
  • Copy the below script and paste it into the Page HTML
 <script src="//sites.google.com/site/blogger9dotnet/color-css/blogger9.js"></script>
<script src="/feeds/posts/summary?alt=json-in-script&amp;max-results=1000&amp;callback=loadtoc" type="text/javascript"></script>
  • Name the Page "Table Of Contents" or any thing else
  • Hit Publish and that's it!
So What's Up : This widget just arrange all the Blog Contents in a social way.And it helps the readers to navigate old and new posts.Stay Blessed ,Happy Blogging! 
#A3

How to Add Stylish Font To Blogger Post Title

Add Stylish Font To Blogger Post Title
By default all the Blogger blogs have the same fonts. So it's better if you spice up your blogspot blog by changing the font of your post title. This will ensure that the blog visitors will notice your blog post and it also looks good. So it's good if we use a different font for the post title. We had created a post on the similar topic long time back, but this is an updated post which will work properly for everyone.


Step 1:
Visit Google Web Fonts and search a font that you like from the list of available fonts. Once you select a font, click on Quick-Use. You will see all the different styles of the selected font. Select the style that you like and on the right side it will show much the font affects the loading time of a page.


Add Stylish Font To Blogger Post Title

On further scrolling down, you will see a code. You have to copy this code as it is and also check the CSS code that is given below it in the Integrate the fonts into your CSS section. It is important to remember that the code is incomplete for the blogger bog and we have to add a / at the end of the code. Here is an example of how the code from the Google page looks

<link href='http://fonts.googleapis.com/css?family=Gorditas' rel='stylesheet' type='text/css'>

and how it looks after adding the / in it at the end.

<link href='http://fonts.googleapis.com/css?family=Gorditas' rel='stylesheet' type='text/css'/>


Add Stylish Font To Blogger Post Title

Step 2:
Now go back to your blogger blog and select the Template section of the blog. Before you do anything, just backup your blogger template by clicking the Backup/Restore option on the top right corner.

Step 3:
Now comes the part when you past the code that you had copied from Google Web Fonts page in your template. Click on Edit HTML option and then select the Proceed option. Now you will have to search  <head> in the template and paste the Google code just below it.

Step 4:
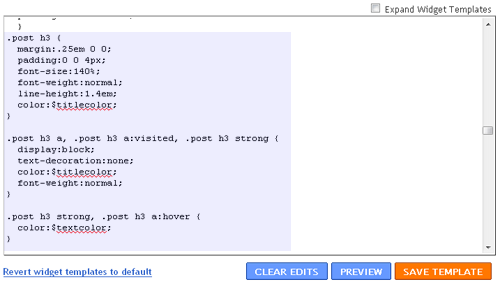
Now search .post h3 or .post h2 , whichever is present in your template. You will see font-size, font-weight or font-family there. If font-family isnt present then you have to paste the Google font-family code and if it is already present then just replace it with the Google code. This is how the code should appear. Its available on the Google page in step 4.
font-family: 'Chau Philomene One', sans-serif; Step 5:
Now click on Save and check your blog. You will see the new font applied to all your blog post titles.

We hope that you found this post useful. Do share it with your friends and if you have any problem, then use the comments section below.
#A3

How To Fully Customize The Post Titles On Blogger

 blog design
Many of the templates both from the Blogger template designer and Custom templates leave the post titles fairly standard.When it comes to fonts, sizes, colors etc.. the post titles on almost all blogs have the same design.But you can add some spice to your post titles without too much hard work and adding even a few minor customizations can make all the difference.Every Blogger template has a small piece of Css that controls how the Post titles appear and by adding or changing small pieces of code we can change the appearance.

So in this post among other changes to your blog titles we will see, How To Change The Size, Change The Color, Change The Background Color or add A Background Image, Change The Font Family and more..

First make sure to back up your template, I'm sure you wont make a mistake but just in case.With that done lets look at some of the effects we can add to Blogger post titles.


How To Customize Post Titles 

The first thing we must do is find the section of Css that controls the post titles.This code will be the same in 95% of blogs so if for some reason it differs in your blog drop a comment and we will help.

From you dashboard click 'Design' > 'Edit Html' (No Need To Expand Widget Templates)

Click 'CTRL F' and look for the following code (CTRL F generates a search bar - More Info)

.post h3 a

This is the section of code that controls your post titles, it will be followed by a few lines of code that create the appearance.

If You Cant find that code try looking for this :

h3.post-title,

Now that you have located the sections of code that control the appearance of your post titles you can change the current Css or add extra Css, lets look at some examples.If you are adding Css it always goes below the code you found.

Make The Text / Font size Bigger Or Smaller - change the font-size number :

font-size: 18px;

Make The Post Titles All Capital Letters -  add the following code directly below .post h3 :

text-transform:uppercase;

Make The Post Titles Bold -  if you see font-weight: normal; change to font-weight: bold; or add font-weight: bold; if it is not already specified.

Move the Post Title To the left, right or in the center -  Change or add the code below :

text-align:left;
text-align:right;
text-align:center;

Add A Background Color To Your Post Titles -  Add The Code Below With Your Desired Color :

background:#000000;

You can change #000000 to your desired color - Get color codes here

Add A Border To Your Post Titles -  Add The Code Below :

border: 1px dashed #cccccc;

You can change the border type dashed to solid or dotted, you can also change the color code from #cccccc - Get color codes here.

Add A Background Image To Your Post Titles -  Add The Following Code :

background:url(http://YOURIMAGE.jpg) repeat;

Replace http://YOURIMAGE.jpg with the image you want to use.

Change the Font Style / Font Family -  Your Css will either have the Font Family similar to this :

font: $(post.title.font);

Or Similar To This :

font-family: Georgia,trebuchet ms, tahoma, Verdana, Arial, Sans-Serif;

To Change The Font Family Replace that code with another font.This link is to Common Fonts For Windows And Mac..Almost all these fonts will work with Blogger.

Remove the current font and add the new font link this :

font-family:FONT FROM ABOVE LINK HERE;

To Look Like This :

font-family: Arial, Arial, Helvetica, sans-serif;

Be sure to add ; at the end of the font family.

There is much more you can do to customize your post titles but we will leave it there for now.Don't go changing your template without having a back up and that way you can play around until you find what your looking for.Another idea is to create a test blog and get the right combination there before changing the real blog..Have Fun !
#A3

How To Change Post Title Color in Blogger Template Designer Templates

How To Change Post Title Color in Blogger Template Designer Templates


I have received a lot of comments on a previous post. Readers are asking how to change the post title color in the new Blogger Template Designer templates. Well, here is a very simple step by step tutorial for you.We'll make some changes in the template CSS and then you'll be able to customize post title without any coding stuff.

Warning: Before making any changes, you must backup your existing layout:

Blogspot How to: Backup Your Blogger (Blogspot) Template

Steps to Make Post Title Font Customizable in the Blogger Template Designer Templates.


  1. Open the Template section.
  2. Blogger Updated Dashboard
  3. Click the Edit HTML button.
  4. Blogger Edit HTML Button
  5. You'll see following page with a LOT of code. Don't worry, just expand <b:skin>...</b:skin>.
  6. After expanding the code in previous step, scroll down a bit and you'll see this code:
    /* Variable definitions
       ====================
  7. REPLACE the above code with the following one:
    /* Variable definitions
       ====================
    
       <Group description="Post Title Color" selector="h3.post-title">
         <Variable name="post.title.link.color" description="Link Color" type="color" default="#ff0000" value="#ff0000"/>
         <Variable name="post.title.hover.color" description="Link Hover Color" type="color" default="#0000ff" value="#00ffff"/>
         <Variable name="post.title.color" description="Color on Post Page" type="color" default="#ff00ff" value="#ff00ff"/>
       </Group>

    Don't save or preview your template yet. Proceed to the next step.
  8. Now find this code:
    ]]></b:skin>
    and REPLACE it with the following one:
    h3.post-title { color:$(post.title.color); }
    h3.post-title a, h3.post-title a:visited { color:$(post.title.link.color); }
    h3.post-title a:hover { color:$(post.title.hover.color); }
    
    ]]></b:skin>
  9. Click the Preview button. You'll see the post title color as blue. Don't worry you can change it later in Blogger Template Designer. Save your template and click the Close button.

Hurray, Coding Done! Go & Customize the Post Title in Template Designer!

Simply click the Customize tab to open the Blogger Template Designer. Select Advanced from the left options. You'll see Post Title Color at the top.:
There are 3 options in the Post Title Color. Here is their detail: Link Color: This is the color of the post title as a link. Any change to this option will appear in the Template Designer. Link Hover Color: This color will appear when someone brings mouse over the post title. Any change to this option will not be visible in the Template Designer. You'd have to Apply the change, open the blog and bring your mouse over the post title to see the change in color. Color on Post Page: This is the color of the post title on post page when post title is not a link. Again, you'd have to Apply the change and open some post title page to see the affect.

Help BetaTemplates!


If this tutorial was helpful then please add a link back to BetaTemplates on your blog. The link code is available at the bottom of this page.

#A3

How to Change Post Title Font, Size & Color

The default Blogger-Blogspot layouts (like Minima) don't allow you to change or customize the look of post title font through Fonts & Colors tab. An HTML/CSS expert can easily change the post title font from the Edit HTML tab but that's not easy for a non-technical person. In this tutorial, I'll tell you how to fully customize the post title font by going to Design -> Template Designer -> Advanced.


1- Find the Existing CSS Code.
From the Dashboard, go to Design then Edit HTML tab.


Find the following code:

.post h3 {
margin:.25em 0 0;
padding:0 0 4px;
font-size:140%;
font-weight:normal;
line-height:1.4em;
color:#333333;
}

.post h3 a, .post h3 a:visited, .post h3 strong {
display:block;
text-decoration:none;
color:#000000;
font-weight:normal;
}

.post h3 strong, .post h3 a:hover {
color: #000000;
}


Blogspot How to: Change Post Title Font, Size & Color


The code, you found above, is responsible for the appearance of post title. If you're not using Minima Blogger-Blogspot template then you might not be able to find this code so please leave your comment with blog address and I'll try to help. If you've found the code then continue with the tutorial.

2- Replace the Existing CSS Code With New CSS Code.


In this step, you have to replace the default code with the following code:

.post h3 { margin: .25em 0 0; padding: 0 0 4px; color: $titlecolor; font: $posttitlefont; }
.post h3 a, .post h3 a:visited, .post h3 strong { text-decoration: none; color: $titlecolor; }
.post h3 strong, .post h3 a:hover { color: $titlehovercolor; }


3- Customize the Post Title Font in Design -> Template Designer -> Advanced Tab


Stay in the Edit HTML tab. Scroll down a little and you'll find this code:

/* Variable definitions
====================


Copy and paste the following code right below the above code:

<Variable name="titlecolor" description="Post Title Color"
type="color" default="#c60" value="#cc6600">
<Variable name="titlehovercolor" description="Post Title Hover Color"
type="color" default="#c60" value="#cc6600">
<Variable name="posttitlefont" description="Post Title Font"
type="font" default="normal normal 18px 'Trebuchet MS',Trebuchet,Arial,Verdana,Sans-serif" value="normal normal 18px 'Trebuchet MS',Trebuchet,Arial,Verdana,Sans-serif">


After adding the above codes, the result would look something like this:

/* Variable definitions
====================
<Variable name="titlecolor" description="Post Title Color"
type="color" default="#c60" value="#cc6600">
<Variable name="titlehovercolor" description="Post Title Hover Color"
type="color" default="#c60" value="#cc6600">
<Variable name="posttitlefont" description="Post Title Font"
type="font" default="normal normal 18px 'Trebuchet MS',Trebuchet,Arial,Verdana,Sans-serif" value="normal normal 18px 'Trebuchet MS',Trebuchet,Arial,Verdana,Sans-serif">


After that, you can just save your template. Now, you can easily customize the post title font through Design -> Template Designer -> Advanced tab.

Need Help?


If you've any problem in this tutorial the feel free to leave a comment, I'll try to answer as soon as possible :-)
#A3

How To SEO Optimize Blog Titles For Higher Search Results


This is what we called Blogger Title Swapping.If you are interested in getting a flood of traffic to your blog,and want to Optimize Blog Titles for Higher Search Results,then you are at the right place.We will show you How To SEO Optimize Your Blog Titles for Higher Search Results.You may have observed that whenever you visit a blog,in browsers title bar you will notice the Blog name(for example ThatsBlogging) and after that you will see the post Title.It will look like the below picture.

But after Swapping it will look like the below picture.

You will think that what is its Bonus Point?The benefit of Applying this trick is that your Blog Title will appear clearly in Google Search results.And according to my experience visitors search for the specific Post not for Blog Title or anything else.So by applying this trick visitors will easily navigate your Blog articles and contents.


How To SEO Optimize Blog Titles For Higher Search Results

  • Go To Blogger Dashboard.
  • Then Click on Template
  • Now Click On Edit HTML
  • Proceed it >> and Click on expand widgets template ( i.e Check the Small Box)
  • Now Search for the Below Code 
<title><data:blog.pageTitle/></title>
It will look like the below picture
  • Now Replace the above Code with the below Script
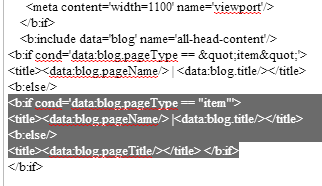
<b:if cond='data:blog.pageType == "item"'> <title><data:blog.pageName/> |<data:blog.title/></title> <b:else/> <title><data:blog.pageTitle/></title> </b:if>
After replacing it will look like the below picture 


  • Now Check for Preview,if it works that's it you are done.
So What's Up:- Applying this trick will surely help you to boost blog traffic,your blog will be at the top of Google Search Results.Now time to apply this trick,so just Open your Blogger Account and do it :)
#A3

How to Automatically Publish Blogger Posts To Facebook,Twitter and Other Social Networks


Social Networks is the backbone for your Blog Traffic.Never underestimate the strength of Social Networking Websites,actually every social networking website is getting  million of hits daily,and if you share your blog post/content there,then surely you can get a flood of traffic to your Blog.Now every Blogger is sick of posting his/her blog posts daily to Facebook,Twitter or other social networking sites,but here we have found an awesome trick via which you can Automatically Publish Your Blogger Posts to Facebook,Twitter, or any Other Social networking website.For installing this Service follow the below easy steps.


How To Automatically Publish Blogger Posts To Facebook and Other Social Sites

  • Visit DLVR.it
  • Now Sign up there,by filling the form with required Data
  • After Entering Email and Password , click on Sign Up.
  • Now Go To Your email inbox and Confirm your Email Address
  • Now it will redirect you to another Page where you have to enter your Blog Feed Burner Username 
  • Click On Twitter Icon at the right side,Now it will redirect you to twitter account,there enter E-mail and Password and Click on Authorize App
  • Now your Blog Posts will Automatically Publish to your Twitter Account
  • Now For Facebook Click On The Facebook Icon at the right side,it will redirect you to Facebook,there enter your username and password,after that they may ask you about Page username i.e Fan Page
  • Enter that and Save Changes


So What's Up

Automatically Publishing Blogger Posts to Social Networking Sites will certainly help you to generate a flood of traffic to your Blog,as i mentioned never underestimate the Social Websites,because you can get alot of traffic to your Blog,However if you apply this service to your Blog,i am sure you will get high traffic.

Question :- How to Apply this Service for Google +?
Answer :-   Actually Now when you post a Content on your blog,after Publishing Blogger Ask you for sharing that Post to Google + ,means they Provide this feature builtinly.

#A3

How to Add Social Sharing Buttons Widget To Blogger


Add Social Sharing Buttons Widget To Blogger

Social Media has become the main source of your Blog/website traffic,there fore never underestimate the social media networks.For Boosting Blog traffic you should add Social Sharing Buttons Widget to your Blog.Which helps you and your visitors to easily share your Blog Contents with their Friends,as a result you will get the bonus of traffic to your blog.The widget we are sharing contain Google+ Share Button,Twitter Tweet Buttons,Stumble,Facebook Send and Like Button,Pinterest,and many other social network buttons.You can add it either above the Blogger Post or Below the Blogger Posts,however it is very simple and clean widget which will not effect your Blog Loading Speed.

How To Add Social Sharing Buttons Widget To Blogger

  • Go To Blogger Dashboard
  • There Click On Template 
  • Now Search for This Script/Code <data:post.body/>
  • After Finding The above Code in Template
  • Copy The Below Script and paste it above(for Showing Buttons above The Blogger Post) or below(for Showing Buttons Below Blogger Post) this Script <data:post.body/>

  <b:if cond='data:blog.pageType == &quot;item&quot;'>   <div class="sharethatsblogging"> <center><div class="headingthatsblogging">Like the Post? Do share with your Friends.</div>     <ul class='social' id='cssanimation'>     <li class='facebook'>     <a expr:href='&quot;http://www.facebook.com/share.php?v=4&amp;src=bm&amp;u=&quot; + data:post.url + &quot;&amp;t=&quot; + data:post.title ' onclick='window.open(this.href,&apos;sharer&apos;,&apos;toolbar=0,status=0,width=626,height=436&apos;); return false;' rel='nofollow'><strong>Facebook</strong></a>     </li>     <li class='twitter'>     <a expr:href='&quot;http://twitter.com/home?status=&quot; + data:post.title + &quot; -- &quot; + data:post.url ' rel='nofollow' target='_blank'><strong>Twitter</strong></a>     </li>     <li class='googleplus'> <a expr:href='&quot;https://plusone.google.com/_/+1/confirm?hl=en&amp;url=&quot; + data:post.url' onclick='window.open(this.href,&apos;sharer&apos;,&apos;toolbar=0,status=0,width=626,height=436&apos;); return false;' rel='nofollow' target='_blank'><strong>Google+</strong></a>     </li>     <li class='pinterest'> <a href='javascript:void((function()%7Bvar%20e=document.createElement(&apos;script&apos;);e.setAttribute(&apos;type&apos;,&apos;text/javascript&apos;);e.setAttribute(&apos;charset&apos;,&apos;UTF-8&apos;);e.setAttribute(&apos;src&apos;,&apos;http://assets.pinterest.com/js/pinmarklet.js?r=&apos;+Math.random()*99999999);document.body.appendChild(e)%7D)());' rel='nofollow' target='_blank'><strong>Pinterest</strong></a>     </li>     <li class='stumbleupon'>     <a expr:href='&quot;http://www.stumbleupon.com/submit?url=&quot; + data:post.url + &quot;&amp;title=&quot; + data:post.title ' rel='nofollow' target='_blank'><strong>StumbleUpon</strong></a>     </li>     <li class='delicious'>     <a expr:href='&quot;http://delicious.com/post?url=&quot; + data:post.url + &quot;&amp;title=&quot; + data:post.title ' rel='nofollow' target='_blank'><strong>Delicious</strong></a>     </li>     <li class='linkedin'>     <a expr:href='&quot;http://www.linkedin.com/shareArticle?mini=true&amp;url=&quot; + data:post.url + &quot;&amp;title=&quot; + data:post.title + &quot;&amp;summary=&amp;source=&quot;' rel='nofollow' target='_blank'><strong>LinkedIn</strong></a>     </li>     <li class='reddit'>     <a expr:href='&quot;http://reddit.com/submit?url=&quot; + data:post.url + &quot;&amp;title=&quot; + data:post.title ' rel='nofollow'><strong>Reddit</strong></a>     </li>     <li class='technorati'>     <a expr:href='&quot;http://technorati.com/faves?add=&quot; + data:post.url ' rel='nofollow' target='_blank'><strong>Technorati</strong></a>     </li>     </ul></center></div>   <link href='http://fonts.googleapis.com/css?family=Englebert' rel='stylesheet' type='text/css'/>​ <style> ul.social { list-style:none; display:inline-block; margin:15px auto; }  ul.social li { display:inline; float:left; background-repeat:no-repeat; }  ul.social li a { display:block; width:50px; height:50px; padding-right:10px; position:relative; text-decoration:none; }  ul.social li a strong { font-weight:400; position:absolute; left:20px; top:-1px; color:#fff; z-index:9999; text-shadow:1px 1px 0 rgba(0,0,0,0.75); background-color:rgba(0,0,0,0.7); -moz-border-radius:3px; -moz-box-shadow:0 0 5px rgba(0,0,0,0.5); -webkit-border-radius:3px; -webkit-box-shadow:0 0 5px rgba(0,0,0,0.5); border-radius:3px; box-shadow:0 0 5px rgba(0,0,0,0.5); padding:3px; }  ul.social li.facebook { background-image:url(https://lh6.googleusercontent.com/-qXQfMpK5yyM/UBgnVp-zyWI/AAAAAAAAFb0/GRnVp4eqO1g/s50/facebook.png); }  ul.social li.twitter { background-image:url(https://lh3.googleusercontent.com/-XoczCzeugFg/UBgnW9gfOMI/AAAAAAAAFcg/N9qWk37w_SA/s50/twitter.png); }  ul.social li.googleplus { background-image:url(https://lh3.googleusercontent.com/-XZA2IVaxutU/UBgnV81TTMI/AAAAAAAAFb8/5-SxVYGD3WU/s50/google%252B.png); }  ul li.pinterest { background-image: url(https://lh6.googleusercontent.com/-Hfy8WKpzfKc/UBgnWW00Z8I/AAAAAAAAFcM/5ppIBhBfhUo/s50/pinterest.png); }  ul.social li.stumbleupon { background-image:url(https://lh5.googleusercontent.com/-D89Zc49MpsM/UBgnWuUueaI/AAAAAAAAFcY/EhOMIXDHPTY/s50/stumbleupon.png); }  ul.social li.delicious { background-image:url(https://lh5.googleusercontent.com/-8YgPtME6n9U/UBgnVlFappI/AAAAAAAAFb4/TJRielU0dVU/s50/delicious.png); }  ul.social li.linkedin { background-image:url(https://lh6.googleusercontent.com/-4yZnL9kjU9w/UBgnWDrtReI/AAAAAAAAFcE/WbW8M0G1QTE/s50/linkedin.png); }  ul.social li.reddit { background-image:url(https://lh5.googleusercontent.com/-BVN-XnkL53g/UBgnWdIXDBI/AAAAAAAAFcQ/v4GRUCSsPLA/s50/reddit.png); }  ul.social li.technorati { background-image:url(http://lh6.googleusercontent.com/-qPJl0bdRDhc/TYA0oJaVlvI/AAAAAAAAAeA/PeJpSyxdyBs/s1600/TBI-technorati.png); }  #cssanimation:hover li { opacity:0.2; }  #cssanimation li { -webkit-transition-property:opacity; -webkit-transition-duration:500ms; -moz-transition-property:opacity; -moz-transition-duration:500ms; }  #cssanimation li a strong { opacity:0; -webkit-transition-property:opacity, top; -webkit-transition-duration:300ms; -moz-transition-property:opacity, top; -moz-transition-duration:300ms; }  #cssanimation li:hover { opacity:1; }  #cssanimation li:hover a strong { opacity:1; top:-10px; } .headinglordhtml{     font-size:25px;     font-family: 'Englebert', sans-serif; } .sharelordhtml{   border-top:30px solid #3873CC;      padding:16px;         -webkit-box-shadow: 0px 7px 9px rgba(50, 50, 50, 0.75); -moz-box-shadow:    0px 7px 9px rgba(50, 50, 50, 0.75); box-shadow:         0px 7px 9px rgba(50, 50, 50, 0.75);     transition: background .777s; -webkit-transition: background .777s; -moz-transition:background .777s; -o-transition: background .777s; -ms-transition: background .777s;     background:#D9D6FF; }  .sharelordhtml:hover {         background:white;  }  ​ </style>  </b:if>
Note:-
- In Magazine Blogger Templates,there are more then two Scripts similar to <data:post.body/>,so do paste the above Script after each script.
  • Now when you paste the above script after <data:post.body/> ,take a Preview and Then Hit save Template.
  • That's it,now take a look on your blog post social sharing widget will dancing there :)

So What's UP

Actually this widget is the main source of many blogger to get a flood of traffic,however this widget is very easy to navigate,so it will help your readers to share your blog contents with their friends.Share your beautiful ideas with us,stay Blessed Happy Blogging :)
#A3

How To Add 5 Star Rating Widget To Blogger


Getting positive feedback from visitors and blog readers enable you to get fame.The Stronger your feedback is the more your blog visitors will be happy.5 Start Rating Widget is an awesome source of getting feedback and Positive response from your readers,this widget show 5 stars at the top or below the blog post,where one can rate your blog article.This Widget also show the total number of views of the article along with the number of votes.You can rate an article by Selecting and Clicking the 5 stars at Once.Actually this Blog has no effect on Blog Loading Speed.

How To Add 5 Star Rating Widget To Blogger


  • First of all Go To Blogger Dashboard
  • Then Click On Template >> Edit HTML
  • Now search for </head> tag
  • After Finding the Head Tag Copy the below Script and paste it just above it or before it.

<link type="text/css" rel="stylesheet" href="http://static.graddit.com/css/graddit.css" />

  • After Implementing the above steps search for this Code <data:post.body/> 
  • Now Copy the Below Code and paste it just above/below <data:post.body/>


<b:if cond='data:blog.pageType != &quot;static_page&quot;'><div expr:id='"labels_" + data:post.id' style='display: none; visibility: hidden;'><b:if cond='data:post.labels'><b:loop values='data:post.labels' var='label'><data:label.name/>,</b:loop></b:if></div>Rate this posting: <div expr:id='data:post.id' class='ffbs_rate'>{[[&#39;&lt;img src=&quot;http://static.graddit.com/img/star.png&quot;/&gt;&#39;]]}</div><div expr:id='&quot;ffbs_stats_&quot; + data:post.id' class='ffbs_stats'></div><script type='text/javascript' expr:src='&quot;http://www.graddit.com/rate/eng/5/&quot; + data:post.id + &quot;?id=&quot; + data:post.id + &quot;&amp;stats=ffbs_stats_&quot; + data:post.id + &quot;&amp;labels=labels_&quot; + data:post.id + &quot;&amp;info=info-&quot; + data:post.id + &quot;&amp;info_delay=2&amp;url=&quot; + data:post.url + &quot;&amp;class_star=ffbs_star_img&amp;class_star_set=ffbs_star_img_set&amp;class_star_vote=ffbs_star_img_vote&amp;views=yes&amp;votes=yes&amp;average=yes&quot;'></script></b:if>

  • Hit Save Template and that's it 

Important to Note

This Widget Provide two option i.e you want to show it before Blog Post or below Blog Post,Actually i will prefer the below section because when readers read your article at the end they decide how was the article.So for adding it Below the Blog Posts Copy the Above Script and paste it below <data:post.body/>,and if you are interested in showing it above the Blog post so do the above steps and paste the copied script above <data:post.body/>.
-If you are using Magazine Style Blogger Template or Responsive Blogger Template,then you have to Copy the above Script and paste it below/above <data:post.body/> as many times as it is in the Template HTML.

So What's Up:- This Widget can impress your blog readers but if you have a good feedback,however it doesn't slow down the blog loading speed,Stay Blessed,Happy Blogging.
#A3

How to Add Stylish Sliding Up Image Description Widget For Blogger


We Got a new Widget i.e Stylish Sliding Up Image Description Widget For Blogger.Let's Play with this widget,this widget enable us to add description below image but How? Its not a unique to add description Below image ? Of-course but in this widget the description will be shown when One hover the mouse over the image and the description will be clearly seen.Does it make Sense,its looking Sound Good.With the help of CSS and HTML this widget can be added easily to Blog.

How to Add Stylish Sliding Up Image Description Widget To Blogger

  • Visit Blogger.com
  • Go To Dashboard
  • Now Click On Layout 
  • And Then Click On Add a Gadget
  • A Box will Pop-up
  • Select HTML/JavaScript
  • Now Copy the below Script and made the Necessary changes which is mentioned clearly 
  • Paste it there and that's it !
<style>.image-box {  width:280px;height:280px;overflow:hidden;background-color:white;  border:1px solid #ccc;float:left;margin:1px 1px;  font:normal normal 12px/1.4 Segoe,"Segoe UI",Arial,Sans-Serif;  color:#333;}.image-container,.image-details {height:280px;border:5px solid white;background-color:#ffc;  transition:margin-top .4s ease-out .4s;}.image-container img {  width:280px;height:280px;padding:0 0;margin:0 0;border:none;outline:none;max-width:none;  max-height:none;  background-color:black;}.image-details h4,.image-details p {  margin:0 0 .2em;padding:0 0;height:70px;}.image-details h4 {  font-size:120%;height:auto;}.image-details .details {  padding:10px 12px;overflow:hidden;}
.image-details .more {  color:white;text-decoration:none;display:block;  text-align:center;font-weight:bold;background-color:#f9a;height:26px;line-height:26px;margin:10px 0 0;}
.image-box:hover {border-color:#bbb; width:280px;  height:280px;}.image-box:hover .image-container {margin-top:-160px}.image-details .more:hover {background-color:black}</style>
<div class="image-box-wrapper" id="image-box-wrapper"> <div class="image-box">  <div class="image-container">   <img width="280" height="280" src="http://4.bp.blogspot.com/-F2yD2BXCAJk/Ua3z1l53o2I/AAAAAAAAAnA/gPBN6hrMeOg/s640/a.aaa-Face-painted-by-hand.jpg" alt="Just">  </div>  <div class="image-details">   <div class="details">    <h4>Lorem Ipsum</h4>    <p>Lorem ipsum dolor sit amet, consectetuer adipiscing elit, sed diam nonummy..</p>    <p><a class="more" href="Blog Post Link ">See More</a></p>   </div>  </div> </div> 
 <div style="clear:both;"></div>
</div>

  • Save it and You are Done !
  • Stay Blessed Happy BlogginG! 
#A3

How To Put a Widget inside a Scroll Box

 
Maybe you have noticed in several blogs/websites that they have alot of widgets which have just ruined there blog style and space.Now to get rid of these long widgets , you can put them in a Box having a Scroll bar.Any tall widget like Blog Archive etc widgets must be placed in a Scroll box.
This will save your Blog Space and will make your blog easy and navigative for readers.Implementing this Widget will enables you to place your widget content in a Scroll box , so your readers can easily navigate blog contents.In this Scroll box , all titles will be static and can easily be accessed by your Readers.
 

How To Put a Widget inside a Scroll Box

  • Find the Widget ID You want to place it in a Scroll box
  • Visit Blogger Dashboard.
    • Click On Template
    • Edit HTML
    • Search for this Code
    ]]></b:skin>
    • Now Copy the below Script and add 
      it above this Script ]]></b:skin>
    /* By thatsBlogging.blogspot.com START */
    #WidgetIdYouWant2PlaceinScrollBox .widget-content {
    height: 200px;
    overflow: auto;
    }
    /* END */  
    • Replace WidgetIdYouWant2PlaceinScrollBox  
      with Widget ID >>Save Template and that's it!

      So What's Up : If You have Any Question regarding this Tut ,
      ask freely we are here to reply! Stay Blessed ,Happy Blogging!
#A3

How to Add Cool Drop Down Menu in Blogger

Drop Down Navigation Menu For Blogger


You may have seen many drop-down menus but today "ThatsBlogging" will present you an incredible Drop Down menu , which is really a magnificent drop down menu.Actually it is developed by the combination of CSS with HTML . Beautiful Colors combinations are used which makes it more significant drop down menu.Actually , drop down menu makes your blog navigative and easy to expand.This drop down menu is very stylish which means your Blog Beauty will increase by adding this menu.Moreover this menu will not slow your blog loading speed.

How To Add Cool Drop Down Menu in Blogger

  • Go To Blogger Dashboard
  • Click On Template
  • Edit HTML
  • Search For </header>
  • Copy the Below Script and Add it below the Closing Header tag ( </header>)
<div id='menubor'></div><center><ul id='menu'>
<li><a class='hmlink' href='#'>Home</a></li>
<li><a class='winlink' href='#'>Blogger Templates</a></li>
<li><a class='maclink' href='#'>Blogger Widgets</a></li>
<li><a class='andlink' href='#'>How To Tuts</a></li>
<li><a class='gamlink' href='#'>Privacy Policy</a></li>
<li><a class='seclink' href='#'>Guest Post</a></li>
<li><a class='linlink' href='#'>About</a></li>
</ul></center>
<style>
#menu li {               
 display: inline;               
 list-style: none;               
 padding: 0;           
 }                   

 #menu li a {                                 
 padding: 15px 20px 15px 20px;               
 text-decoration: none;               
  color:white;
  font-family: 'Noto Serif', serif;
-moz-box-shadow: inset 0 0 13px -2px #000;
-webkit-box-shadow: inset 0 0 13px -2px #000;
box-shadow: inset 0 0 13px -2px #000;
  font-size:18px;
  -webkit-border-bottom-right-radius: 10px;
-webkit-border-bottom-left-radius: 10px;
-moz-border-radius-bottomright: 10px;
-moz-border-radius-bottomleft: 10px;
border-bottom-right-radius: 10px;
border-bottom-left-radius: 10px;
  transition: padding-bottom .666s;
-webkit-transition: padding-bottom .666s;
-moz-transition: padding-bottom .666s;
-o-transition: padding-bottom .666s;
-ms-transition: padding-bottom .666s;
  
  
}
 #menu li a:hover {                                 

  padding-bottom:20px;
}
.hmlink{
  background:#24459A;
}
.winlink{
  background-color: rgba(9,173,217,1);
}
.maclink{
  background-color: rgba(108,109,112,1);
}
  .weblink{
    background:#EEEE00;
    color:black;
  }
.andlink{
  background-color: rgba(149,191,43,1);
}
.gamlink{
  background-color: rgba(212,2,43,1);
}
.seclink{
  background-color: rgba(0,158,62,1);
}
.linlink{
  background-color: rgb(123, 82, 138);
}
#menubor{
  border-top:1px solid black;
  margin-bottom:-1px;
}
  .header-outer{
    padding-bottom:20px;
  }
</style>

Changes

  • For Changing the Links Replace # with your Own Links and the Anchor text with your desired text
  • That's it , Save Your template and have fun !
  • If you are interested in adding extra <li> options for that add  <li><a class='desiredword' href='#'>text</a></li> between <ul> and </ul> tags.
  • After implementing the above step ,  you have to define the class in CSS for that define the class between the style container and hit save.
  • If you have any Question ask it freely !! Stay Blessed , Happy Blogging !
#A3

How to Replace Blogger 404 Page with Beautiful Search Box in Blogger

Replace Blogger 404 Page with Beautiful Search Box in Blogger

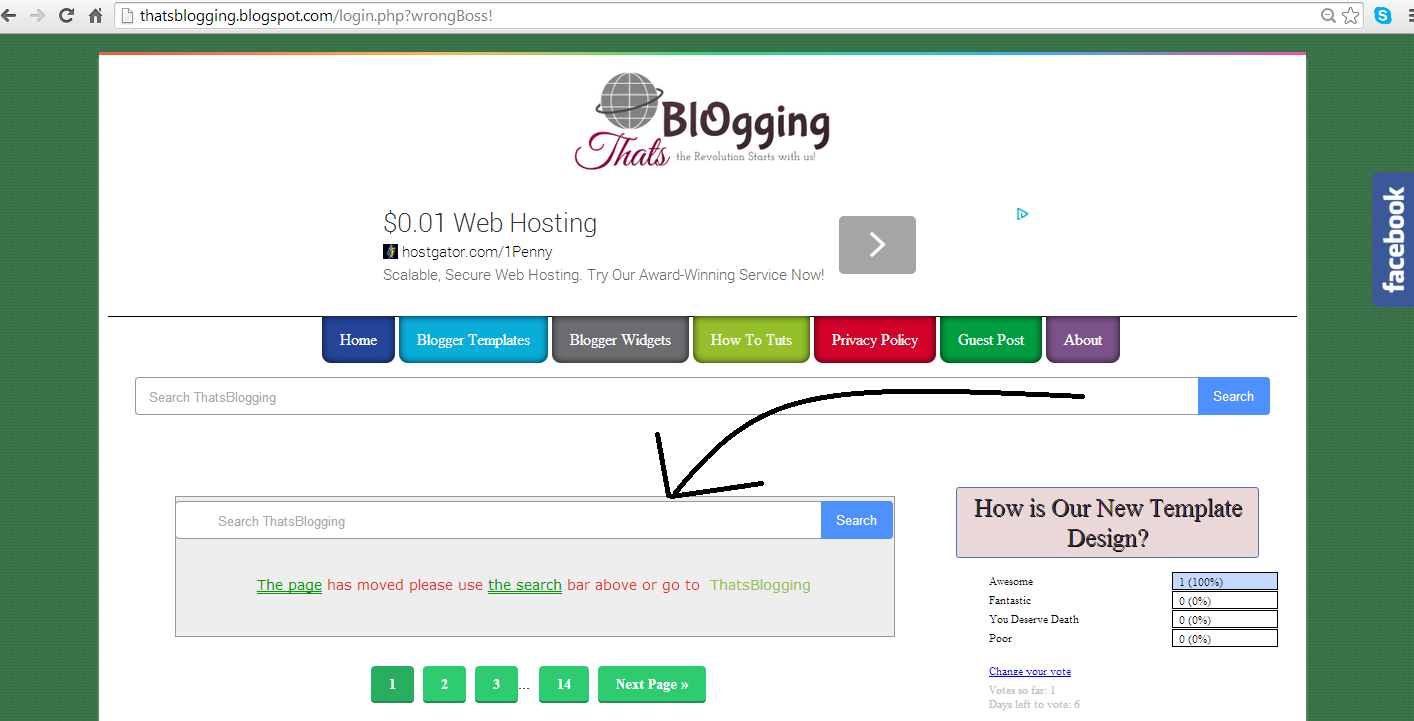
Blogger is not dynamic as WordPress , and can't compete with WordPress  however experts matters every where.Here we have found a way via which you can easily Replace Blogger 404 Page with Beautiful Search Box.This will make your blog navigative and easy to understand.Whenever some one enters any wrong URL or any address it will show the search box and link to the home page via which he/she can get back into the homepage or can search your blog for any other query! Moreover the design of this search box is very cute it will give a great touch to a fancy design of your blog.Let's see how it works!


 Replace Blogger 404 Page with Beautiful Search Box in Blogger

  • Go To Blogger Dashboard 
  • Click On Settings
  • Then Click On Search Preferences
  • In Errors and redirections section Click On Edit (custom page not Found)
  • Copy the below script and paste it over there
<style>
#search-button-links1 {
    position: relative;
    top: 0;
    right: 0;
    height: 60px;
    width: 580px;
    font-size: 18px;
    color: #000;
    text-align: center;
    text-decoration:none;
    line-height: 42px;
    border-width: 0;
    background-color: #5caddf;
margin:5px;
    cursor: pointer;
}
#search-box1 {
    position: relative;
    width: 100%;
    margin: 0;
}
#search-form1 {
    height: 40px;
    border: 1px solid #999;
    -webkit-border-radius: 5px;
    -moz-border-radius: 5px;
    border-radius: 5px;
    background-color: #fff;
    overflow: hidden;
}
#search-text1 {
    font-size: 14px;
    color: #ddd;
    border-width: 0;
    background: transparent;
}
#search-box input[type="text"] {
    width: 90%;
    padding: 11px 0 12px 1em;
    color: #333;
    outline: none;
}
#search-button1 {
    position: absolute;
    top: 0;
    right: 0;
    height: 42px;
    width: 80px;
    font-size: 14px;
    color: #fff;
    text-align: center;
    line-height: 42px;
    border-width: 0;
    background-color: #4d90fe;
    -webkit-border-radius: 0px 5px 5px 0px;
    -moz-border-radius: 0px 5px 5px 0px;
    border-radius: 0px 5px 5px 0px;
    cursor: pointer;
}
</style>
<div id='search-box1'>
  <form action='/search' id='search-form1' method='get' target='_top'>
    <input id='search-tex1t' name='q' placeholder='Search ThatsBlogging' type='text'/>
    <button id='search-button1' type='submit'><span>Search</span></button>
  </form>
</div>
<p style="color:#e33633; font-family:verdana, sans serif; font-size:16px; padding:24px; text-decoration:none">This Page has been removed for safety purposes | Visit <a href="http://thatsblogging.blogspot.com">ThatsBlogging</a>

Modifications

You can change the text highlighted in red to the desired text you need! The above section of this code is just a chunk of code for CSS and the below is 2 divs which will help to declare the search box area.Hope you got it , if you got any problem feel free to comments below.Stay Blessed , Happy Blogging!
#A3

How to Add Horizontal Menu Bar in Blogger

Making Your Blog Simple and navigative grow the love of readers and visitors.Actually the Horizontal Menu Bar is an awesome bar which can be placed at the top of Blog or below header Section,which will certainly helps the readers to easily navigate,contact,and explore your blog contents.In this regards,here is a cool Horizontal menu bar (Black Style) which can make your blog navigative and friendly.

How To Add Horizontal Menu Bar in Blogger


  • Now Search for ]]></b:skin>
  • Copy and paste the below script above ]]></b:skin>

#Wrapper_Nav{background:#111; height:35px;}
.Top_Menu{margin:0 auto; width:960px}
.Menu a{color:#fff; display:block; padding:4px 7px;text-decoration:none}
.Menu a:hover{background:#f4f4f4; color:#333; display:block}
.Menu ul{list-style:none; margin:5px 0}
.Menu li{float:left; height:25px}
.Menu{float:left; height:35px; width:960px}

  • Now Search for <body>
  • Now Copy The Below Script and add it below <body> tag

<div id="Wrapper_Nav">
<div class="Top_Menu">
<nav class="Menu">
<ul>
<li><a href="#">Home Tab</a></li>
<li><a href="#" rel="author">About You Text</a></li>
<li><a href="#">Contact Text</a></li>
<li><a href="#">Forum Site</a></li>
<li><a href="#">Advertise Money</a></li>
<li><a href="#">Guest Post</a></li>
<li><a href="#">Text</a></li>
<li><a href="#">Privacy Policy Of Your Blog</a></li>
<li><a href="#">Disclaimer Text</a></li>
</ul>
</nav>
</div>
</div>

  • Replace # with the specific links you want to redirect,also change the text to your desired text.
  • Note :- If you are interested in adding more menus,simply add "<li><a href="#">Text</a></li> b/w <ul> and </ul>
  • Save Your Template
  • That's it !
So What's Up:- Actually this menu bar will make your Blog navigative to the readers,they can explore your blog contents easily by clicking the labels,Share your ideas with us,stay Blessed,Happy Blogging !
#A3

Komentar Terbaru

Just load it!